|
|
|
|
|
|
| Last published: 06 January 2006 |
User GuideThis document describes how to use the Flow4J Plug-in and how to integrate it efficiently in java- and web-applications. Contents
Eclipse Project Nature
As an introduction you should understand what an
Eclipse Project Nature is. Here is an excerpt from the
Eclipse Plug-in developer Guide:
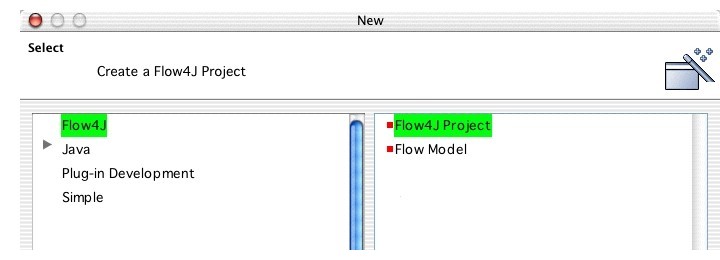
Flow4J ProjectFlow4J projects have the Flow4J nature and possible other natures. The Flow4j nature gives Flow4J projects the ability to transform flow models into java source code. After this automatic code generation process, the JDT Plug-in can be used to create the flow's byte code. Thus Flow4J projects should also have the Java nature to generate the flows byte code in the same build process. You have two possibilities to get a project with the Flow4J nature:
In the same way as you add th e nature in (2.), you can also remove the Flow4J nature from Flow4J projects. Other natures are not affected by the removal. Adding the Flow4J nature to a project has the effect that a so called Flow Builder is added to the project's builders. This entry is visible in the "External Tools Builders" panel of the project's properties. If you look at this panel, you may notice that the flow builder is inserted in front of the java builder. This becomes clear if you look at the actions that are performed as a while building the project.
You see, the flow builder has to be in front of the java builder because the java source files need to be created first, prior to be compiled by the java builder. Flow ModelThe flow model holds the flow's logic. The Eclipse build process transforms the flow model into java source code. 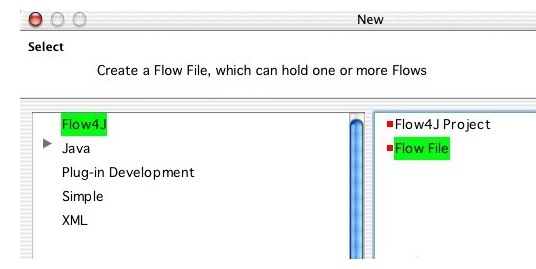
If you store the flow model in Eclipse, an XML representation of the flow model is created and stored in the flow file. Flow files have the .f4j extension. Opening a flow file with a double-click activates the Flow Graphical Editor which is the de fault editor to model your flows. Flow Graphical EditorThe Flow Graphical Editor is the "tool" to design flows. With it's help, you can model the flow's runtime behaviour in a drag and drop manner. The flow editor has two areas
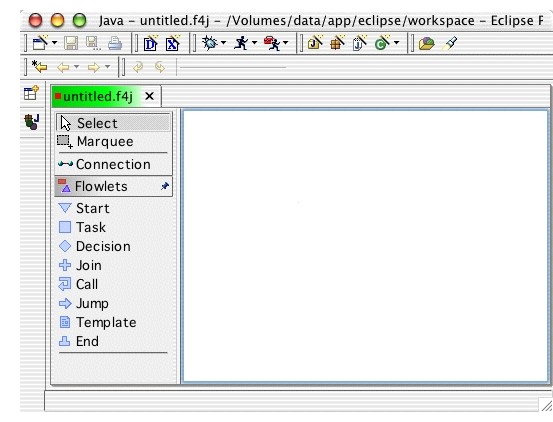
A flow contains a series of flowlets. Flowlets are the building blocks of a flow. They are connected to each other with Connections . To place a flowlet in the drawing area, click on the desired tool's label in the palette, and then click at a free region in the drawing area where the flowlets should be placed.
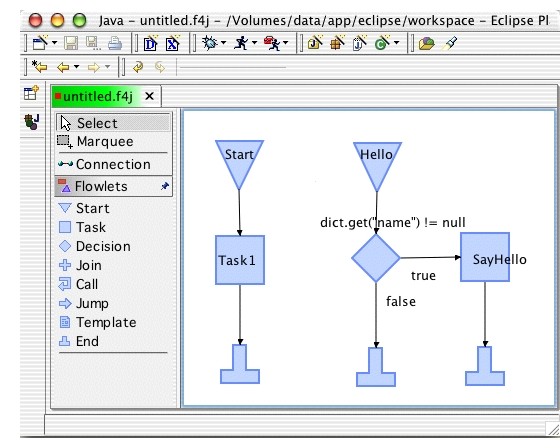
Normally a flow model contains one flow. That's why I often
say "flow" to the flow model. Technically, in the flow editor,
it is possible to build a flow model that contains more
than one flows, as in the next image. In such cases
there is often one main flow and some sub flows which belong together
in the same flow model. Creating sub flows is a way to modularize
parts of a flow. This improves reusability, and it's also
easier to work on some small, easy to understand sub flows than
on one large, complex flow that does not fit on the screen.
In the runtime environment, like a web application the flow has to be accessed in some way. For this purpose, every flow model has a unique name, which is not the file name itself. This name, the Flow Name should be a characteristical name for the flow model. The flow name is used to register the flow's runtime class at th e Flow4J runtime environment in order to access it, for example, by a HTTP request. The flow name can be changed in the flow's properties view. Click at a free area in the flow editor and open/select the properties view. 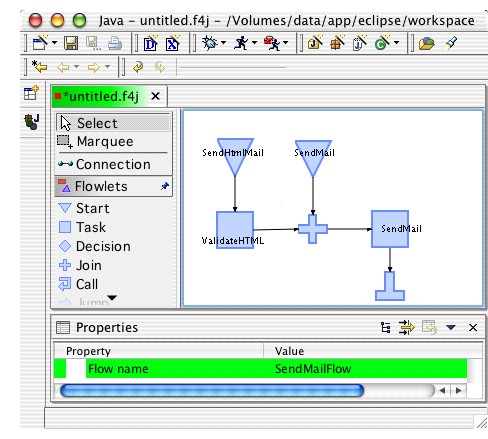
Inside a flow model all start flowlet names have to be different. In the previous image the start nodes can be accessed in the following way:
In a later section, flow execution will be explained in detail. Flow DictionaryThe Flow Dictionary contains information in the form of key-value-pairs. The same dictionary instance is passed from one flowlet to the next while processing the flow. Every flowlet can read data from it, or add new data to it, which may be needed by following flowlets. The flow dictionary extends the java.util.Map and adds the following convenience methods to it. All methods have only one argument, key with type String
All methods of the Map interface, like get(), put() ..., are available when working with the flow dictionary. FlowletsFlowlets in a simple flow are like process steps in a process or chain links in a chain, which are linked together. More complicated flows contain branching and jumps to other flows etc. In most cases business processes resemble these complex flows. As already mentioned, flowlets are the the building blocks of flows. Flowlets have sensitive connection points where they can be connected to other flowlets. A flowlet may have two types of connectors:
Here is an example for the various types
Flowlets can have a Label like the start flowlet. The selected label's text can be changed in the properties view. Don't forget to select the flowlet before! 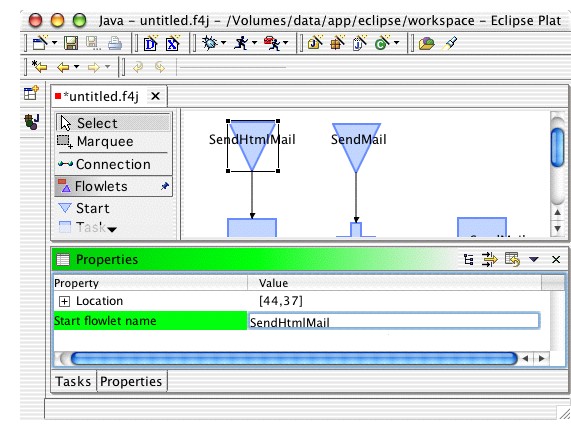
To see or change the properties of the flowlet, it's also possible to select the flowlet's label. Both of the following pictures will show the properties of the same flowlet: 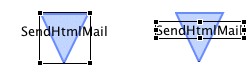
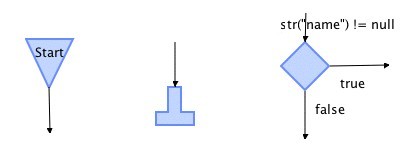
In future releases the designer will be able to handle other figures than flowlets. One example of such a figure will be a text area where comments on the flow or flowlets can be placed. These text areas won't be connected to the flow, so they won't be flowlets. I'm still looking for an adequate name for them. Start FlowletA start flowlet is the entry point for a flow. 
In one flow model all start flowlets need to have a unique name , otherwise only one can be accessed and it's undetermined which one of them. The default name of start flowlets is "Start". A flow can have more than one start flowlets, so that the flow's execution can begin at different places, at different start flowlets. In the Flow4J Designer, Start Flowlets have a dynamically extendable property list. This means that you specify a comma separated list of property names, and Eclipse generates the Property Descriptors automatically. If you select a Start Flowlet and open the Properties View, you can add propertiy keys in the line "Property names (comma separated)". 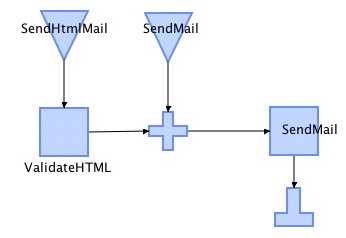
Task FlowletA task flowlet wraps a specific task or functionality. 
Such a task is a java class that implements the
The following methods have to be overridden/implemented by the developer:
The usage of task propertie s is discussed later. Task flowlets have a special feature, that helps a lot while developing with Flow4J: The designer indicates whether the task's class can be found in the projects classpath. Have a look at the following example: 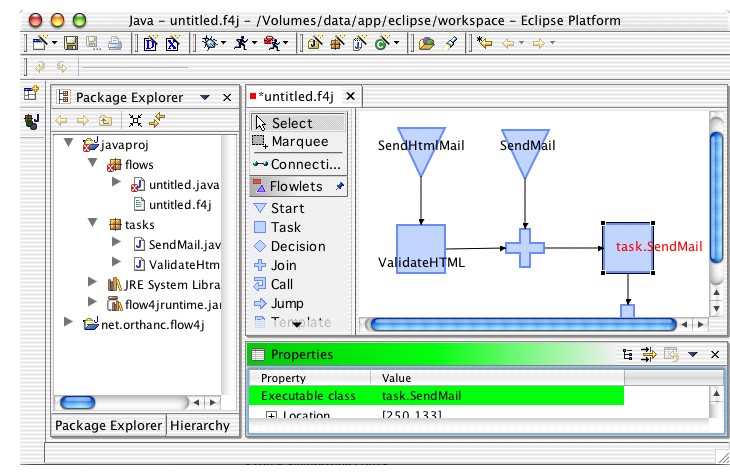
In this example we have two java packages:

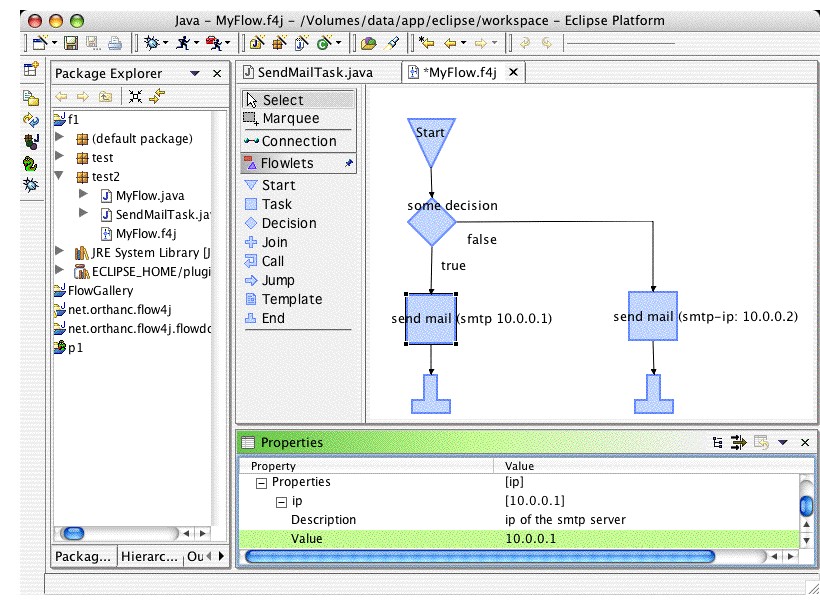
Task flowlet names can be parameterized. This means, if the
task has properties, then a property value can be displayed
in the task flowlet's name.
In the following sample the class
public class SendMailTask extends AbstractTaskFlowlet {

  public void execute(FlowDictionary dict) {
    ...
  }

  public String getName() {
    return "send mail (smtp-ip: ${ip})";
  }

  public TaskPropertyDescriptors getPropertyDescriptors() {
    TaskPropertyDescriptors d = new TaskPropertyDescriptors();
    d.addPropertyDescriptor("ip", "ip of the smtp server");
    return d;
  }
}
The task flowlet's java class file can be created with the help of a wizard, similar to the creation of a generic java class. For this reason the toolbar contains the following tool: 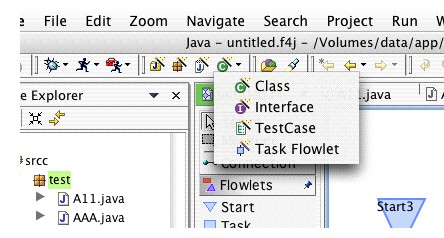
The following wizard defaults to a general task flowlet base class that resides in the Flow4J runtime package. In the wizard you can specify the creation of the method stubs for task properties, in- and out-parameters. Hitting the "Finish" button generates the tasks's java source file and opens it. The All methods in the class file contain predefined javadocs and default values for the task name and description, that you may change. 
Script FlowletScript flowlets are task flowlets written in a scripting language like Python, Groovy or others. Using scripted tasks in Flow4J is described in this document 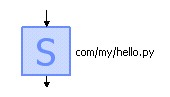
Note that there is no tool for script flowlets in the designer's palette. You can only place a script flowlet on the designer by drag and drop.
Decision FlowletA decision flowlet allows the flow to branch , depending on a boolean value. 
The decision checks the given statement while runtime.
The Statement must be a valid java statement that will be
insterted in an specific
"Alex".equals(str("name"))
i("counter") < 15
getInteger("numberItems") != null
//	methods of the Map interface
! isEmpty()
containsKey("hallo")
The flow dictionary extends
The statement of a decision flowlet can be quite "technical" for somebody who has ot much programming experience. For this reason a decision flowlet has an additional property "description" which can be any sort of explanatory description. The next image shows an example of this feature. 
As long as a description is provided, it is shown in the designer. Of cource double clicking on the decision flowlet's label enables the editing of the flowlet's statement and not its description. The decision can only be set in the properties view. The flowlet's tooltip also shows the statement.
All decision flowlets have two outgoing connections.
One for the
Join FlowletThe join flowlet's purpose is to join one to maximum three branches of the flow. 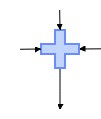
An extreme situation is if you have one incoming and one outgoing connection. In this case you can leave the join flowlet simply away and connect the two flowlets directly. If you don't remove the unnecessary join flowlet yourself, then the java source code generator detects and optimizes it away.
Call FlowletThe call flowlet leaves the current flow in order to execute another flow and then returns back to the calling flow. All information that is available to the calling flow is passed over to the called flow. If the called flow adds information to the flow dictionary then this new information will be available for the rest of the calling flow. 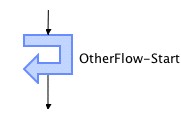
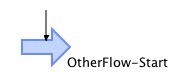
Jump Flowlet
The jump flowlet passes control completely to the
other flow.
All information that is avaliable to the
current flow is passed over to the other
flow.
Template Flowlet
The template flowlet is useful in GUI applications
or web applications
where the the process returns a
The name of the template or its indicator String
is stored in the flow dictionary with a special key
that is defined in the
static final public String DICT_KEY_TEMPLATE_NAME = "TEMPLATE_NAME"; In your java or web application you can access the templete name in the following way:
FlowDictionary dict = new FlowDictionary();
dict.add("name", "Alex");
FlowManager.executeFlow(MyFlow.class, "Start", dict);
String templateName = dict.get(Flow4JRuntimeConsts.DICT_KEY_TEMPLATE_NAME);
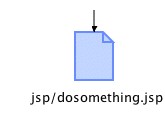
The template flowlet is a terminating flowlet that has no more flowlets behind it.
End FlowletThe end flowlet indicates the end of the flow. Usually sub-flows, which are called by other flows or flows which are called internally from java code are terminated in this way. The contents of the flow dictionary are available to the caller after flow execution. 
The template flowlet is a terminating flowlet that has no mor e flowlets behind it.
Build Process
The Eclipse build process is triggered by the user,
or is automatically triggered by the Eclipse platform if
the "Perform build automatically on resource modification"
feature is checked in the workbench preferences.
Through the build process of a flow model, that is
an XML file on the filesystem, the model is transormed into
java source code. The java source code contains the same flow
logic as visible in the designer.
Here is the java source code of an empty flow file,
that is automatically created by the Flow4J Plug-in.
All created flow classes implement the
/*
 * This class was automatically generated by the
 * Flow4J-Eclipse Plug-in
 */
package flows;

public final class testFlow3 implements net.orthanc.flow4j.runtime.IFlow {

  final public String getFlowName() {
    return "testFlow3";
  }

  public void execute(String startFlowletName,
                      net.orthanc.flow4j.runtime.FlowDictionary dictionary)
  {
    throw new net.orthanc.flow4j.runtime.Flow4JRuntimeException(
      "start node \"" + startFlowletName + "\" not found in flow \""
      + this.getClass().getName() + "\"");
  }
}
If you build a Flow4J project, in the first step flow files will be transformed to java source code and then the java source files will be compied by tha JDT Plug-in's java compiler as already described in the Flow4J Project section.
After the build process the flow's java source file
resides in the same folder, beside it's
flow XML file.

Project PropertiesWith the help of project properties, you can influence the projects behaviour in the IDE. Flow4J projects have the following property sections (currently only one):
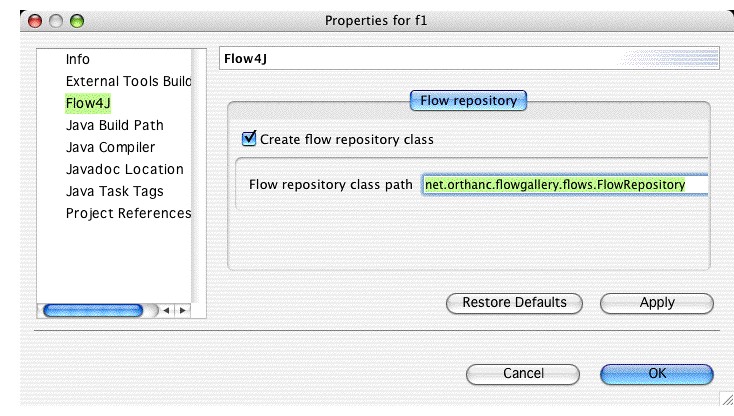
In the "Flow repository" panel you can decide whether the
plugin should automatically generate a Java source file
that contains a collection of all registerable flow classes.
package test;

public class TestFlowRepository implements net.orthanc.flow4j.runtime.IFlowRepository
{
  public java.util.Collection getFlowClasses()
  {
    java.util.List classes = new java.util.ArrayList();
    classes.add(test.SomeFlow.class);
    classes.add(test.OtherFlow.class);
    classes.add(test.login.LoginFlow.class);
    return classes;
  }
}
Registering all flows is quite easy: FlowManager.registerFlows(new test.TestFlowRepository()); The Java source code is generated by an additional Builder object "Repository Builder". This builder is executed after the "Flow Builder" but before the "Java Builder". So that it is compiled together with the flow classes. Now, if you have more than one source folders on your build path, in which one will the Plug-in generate the new class? The Repository Builder first looks for the class's package in all source folders. If the package already exists, then the new new java source file will be generated in this package folder. If the package does not exist yet, then the Plug-in generates the package structure and the Java file in the first source folder that is specified on the project's build path. Flow4J RuntimeThe Flow4J runtime is completely independent from the Flow4J Eclipse Plug-in.
After all flows are compiled to java bytecode, they can be deployed into any java web/application in the same way as other .class files, or as a jar archive. in the most cases you will deploy the following jars:
Here is a list of all runtime classes:
Task Flowlet Properties/ParametersTask Properties
In order to improve reusability, task flowlets may have "properties".
For example you can implement a SendMail task flowlet that doesn't has its
SMTP address hard coded in the task flowlet, but provided in the form of a
property. So the application can use the SendMail task many times with a different
SMTP address.
The following steps have to be taken to use task properties, which are also visible in the task flowlet's tooltip:
Task Parameters Task flowlet input/output properties were introduced to visualize which parameters the task expects to be in the dictionary and which parameters the task puts into the dictionary. Here is a sample how to declare and visualize these parameters.
package my.f4jprj.tasks;

import net.orthanc.flow4j.runtime.AbstractTaskFlowlet;
import net.orthanc.flow4j.runtime.FlowDictionary;
import net.orthanc.flow4j.runtime.descriptors.TaskParameterDescriptors;
import net.orthanc.flow4j.runtime.descriptors.TaskPropertyDescriptors;


public class SendMailTask extends AbstractTaskFlowlet {

	public void execute(FlowDictionary dictionary) {
		//	send mail functionality
	}

	public String getName() {
		return "send mail";
	}

	public TaskParameterDescriptors getInputParameterDescriptors() {
		TaskParameterDescriptors descs = new TaskParameterDescriptors();
		descs.addParameterDescriptor("mailto", String.class, "Mail recipient");
		descs.addParameterDescriptor("subject", String.class, "Mail subject");
		descs.addParameterDescriptor("body", String.class, "Mail body");
		return descs;
	}

	public TaskParameterDescriptors getOutputParameterDescriptors() {
		TaskParameterDescriptors descs = new TaskParameterDescriptors();
		descs.addParameterDescriptor("errors", "java.util.List",
				"Collection of errors and exceptions. Not present if none.");
		return descs;
	}

	public String getDescription() {
		return "Sends an Email";
	}

	public TaskPropertyDescriptors getPropertyDescriptors() {
		TaskPropertyDescriptors descs = new TaskPropertyDescriptors();
		descs.addPropertyDescriptor("smtpServerIP", "IP of the smtp server");
		return descs;
	}
}
The input parameters a declared with the help of the
Most important task information is shown in the task flowlet's tooltip as shown on the next image. 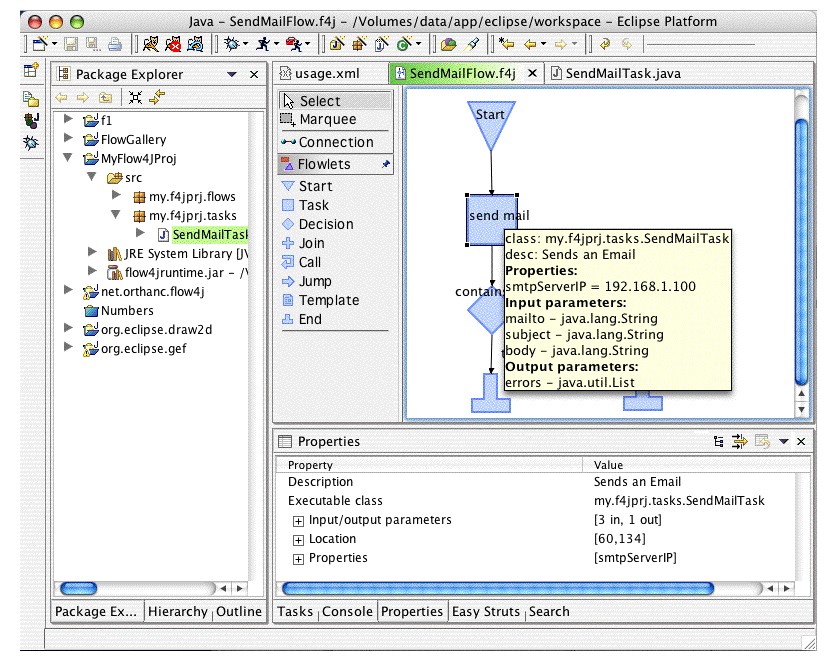
Registering Flows
In order to use the
FlowManager.registerFlow("com.package.flows.SomeFlow");

IFlow myFlow = new com.package.flows.SomeFlow();
FlowManager.registerFlow(myFlow.class);

Collection flowCollection = new ArrayList();
flowCollection.add(new com.package.flows.SomeFlow());
flowCollection.add(new com.package.flows.OtherFlow());
FlowManager.registerFlows(flowCollection);

//	the IFlowRepository interface has one method:
//	public Collection getFlowClasses();
//	the collection contains java.lang.Class instances
//	as in the last example
IFlowRepository flowRepository = new com.package.flows.FlowRepos();
FlowManager.registerFlows(flowRepository);
Register TasksTask flowlets are automatically registered in the generated flow classes. So you don't ha ve to bother with them. Execute FlowsTo execute a flow, a bunch of methods are available:
FlowDictionary dict = new FlowDictionary();
dict.put("name", "Alex");

FlowManager.executeFlow("SomeFlow", "Start");
FlowManager.executeFlow("SomeFlow", "Start", dict);

FlowManager.executeFlow("SomeFlow-Start");
FlowManager.executeFlow("SomeFlow-Start", dict);

IFlow myFlow = new com.package.flows.SomeFlow();
FlowManager.executeFlow(myFlow.class, "Start");
FlowManager.executeFlow(myFlow.class, "Start", dict);
Servlet UsageFlow4J offeres the possibility to trigger flow execution directly by a browser request. Depending on the desired response type of the flow (text or binary), there are two servlets you can use:
To put these servlets into action, put lines similar to these in your WEB-INF/web.xml file:
<servlet>
  <servlet-name>Flow4JJSPDispatcherServlet</servlet-name>
  <display-name>Flow4J JSPDispatcherServlet</display-name>
  <servlet-class>net.orthanc.flow4j.runtime.servlet.JSPDispatcherServlet</servlet-class>
  <init-param>
    <param-name>flow-repository-class</param-name>
    <param-value>flows.MyFlowRepository</param-value>
  </init-param>
  <init-param>
    <param-name>servlet-path</param-name>
    <param-value>flow</param-value>
  </init-param>
  <load-on-startup>1</load-on-startup>
</servlet>

<servlet-mapping>
  <servlet-name>Flow4JJSPDispatcherServlet</servlet-name>
  <url-pattern>/flow/*</url-pattern>
</servlet-mapping>
The
To be able to return binary content, that is computed directly by some task flowlets, insert the following lines in your WEB-INF/web.xml file: <servlet> <servlet-name>Flow4JFlowDispatcherServlet</servlet-name> <display-name>Flow4J FlowDispatcherServlet</display-name> <servlet-class>net.orthanc.flow4j.runtime.servlet.FlowDispatcherServlet</servlet-class> </servlet> <servlet-mapping> <servlet-name>Flow4JFlowDispatcherServlet</servlet-name> <url-pattern>/binary/*</url-pattern> </servlet-mapping>
Important:
The given url-pattern allows to call the following URLs to execute the "TimeFlow" beginning at the "Start" start flowlet: http://server:port/webappcontext/flow/TimeFlow-Start or http://server:port/webappcontext/flow/TimeFlow-Start?name=Alex&age=33 if you want to return binary content like a PDF file, the following URL could be used: http://server:port/webappcontext/binary/PDF-Create?... Custom JSP TagsThe Flow4J web framework introduces a custum JSP tag to generate URLs to a flow. Here are some examples:
<%@ taglib uri="flow4j" prefix="f4j" %>

<META HTTP-EQUIV="refresh" CONTENT="0;URL=<f4j:link flowstart="Game-Start"/>">
or
<form action="<f4j:link flowstart="Game-Guess"/>" method="post">
...
</form>
or
<a href="<f4j:link flowstart="Game-Start"/>
            <f4j:param name="name" value="Alex"/>
         </f4j:link>">new game</a>
The link tag has one attribute "flowstart" that declares
which flow should be executed at which start node.
Another attribute is the "ignorelevels" attribute.
It is necessary if you
use the tag in directly called jsp pages like
http://server/a/b/c/d/bla.jsp
FlowdocFlowdoc is a way to generate flow documentation of Flow4J projects. All Flowdoc functionality is packaged in a separate Eclipse Plug-in, so don't forget to install it beside the Flow4J-Core Plug-in. See installation guide . The Flowdoc export wizard generates HTML pages similar to the javadoc tool, thus the HTML frameset contains the typical frames like packages, classes and class details. Every flow is transformed to a Java class so browsing the flow documentation is like browsing classes. The flow details page can contain the following information:
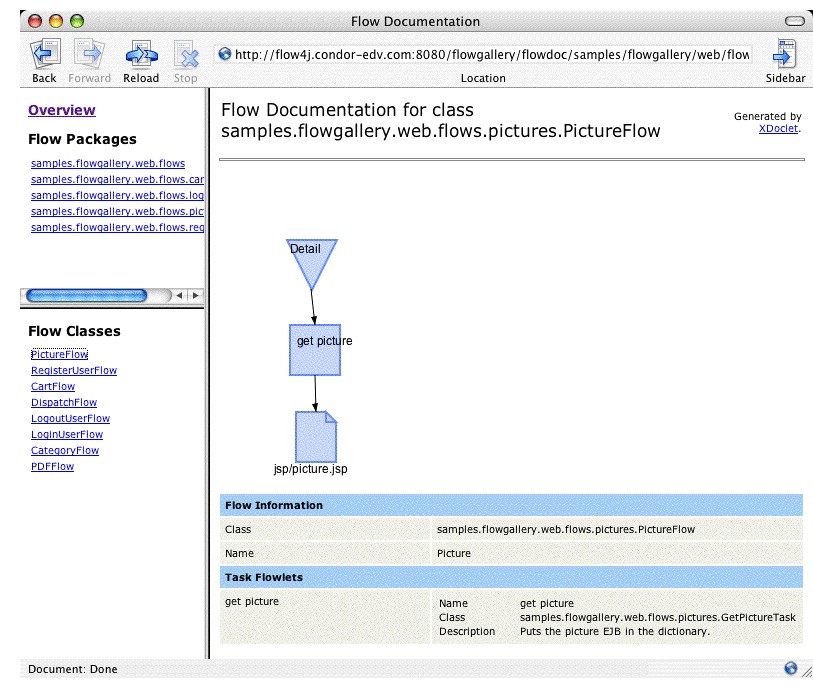
The above flow documentation can be seen in action at FlowGallery documentation The export process is triggered in the same way as the javadoc generation. Select the "Export..." menu item from the "File" menu or from the project's context menu. 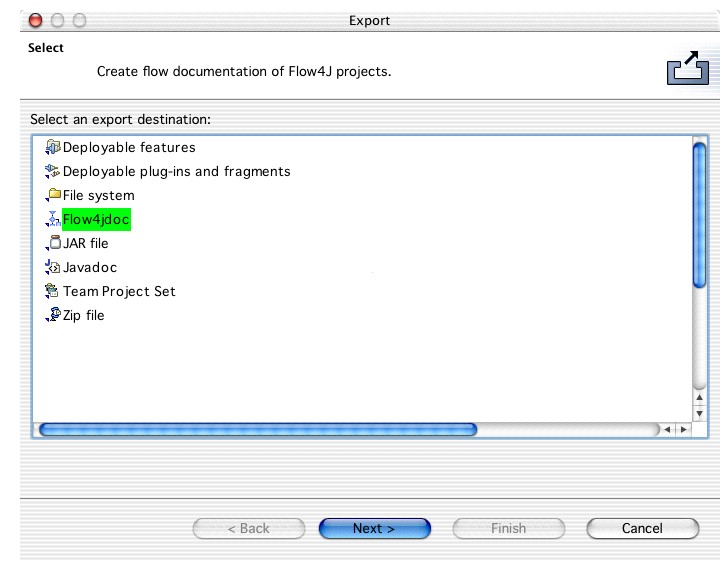
On the next page, after you click on "Next", flows can be selected which should be exported and also the destination folder. The destination folder will contain a "flowdoc" dictionary which contains the flow/class structure.
Now some technical aspects. The Flowdoc export wizard generates a small ant script
in the background which is executed to create the flow images and HTML pages.
This ant script is saved to
cd ECLIPSE_HOME/workspace/.metadata/.plugins/net.orthanc.flow4j
ant -buildfile flowdoc_build.xml
You can also take this ant script and copy the flowdoc target in your custom ant scripts to extend it with flow documentation generation. Flowdoc uses XDoclet to generate the HTML pages. Third Party IntegrationFlow4J as an effective Controller part of any MVC architecture, can be integrated in the following frameworks:
Integration classes of these framework are all in the package
Apache Struts IntegrationAll integration details are describen in a separate document . Jakarta Velocity Integration
The Flow4J integration with the powerful Velocity template engine
is quite easy, as you will see in this section. The main interface
between Flow4J and Velocity is the Velocity
<servlet>
  <servlet-name>VelocityFlowDispatcherServlet</servlet-name>
  <display-name>Velocity FlowDispatcherServlet</display-name>
  <servlet-class>net.orthanc.flow4j.runtime.connectors.velocity.VelocityFlowDispatcherServlet</servlet-class>
  <init-param>
    <param-name>flow-repository-class</param-name>
    <param-value>com.mycomp.myproj.flows.MyFlowRepository</param-value>
  </init-param>
  <load-on-startup>1</load-on-startup>
</servlet>

<servlet-mapping>
  <servlet-name>VelocityFlowDispatcherServlet</servlet-name>
  <url-pattern>/flow/*</url-pattern>
</servlet-mapping>
With the above mapping URLs like the following example can trigger flows which result in a Velocity template: http://server/webapp/flow/SomeVelocityFlow-Start?...
The Flow4J Velocity controller servlet may register the flows in the sepcified
flow repository in its
To make make the Flow4J Velocity integration as convenient as possible,
all velocity task flowlets may extend from the
The default implementation of the first method is to extract the Velocity context
from the flow dictionary and to call the second
That's it, and enjoy. Alex |
|||||||||||||||||||||||||||||||||||||||||||||||||||||||||||||||||||||||||||||||||||||||||||||||||||||||||||||||||||||||||||||||||||||||||||||||
 SourceForge Summary
 Documentation